
Front Runner Slimline II Interior Cargo Tray - Custom Fit
(0 reviews)
Price: $899.00
In Stock
Front Runner Slimline II Interior Cargo Tray - Custom Fit
Item # FR98RV
Our Price: $899.00
Will this fit?
To see if this custom-fit item will work for you please tell us what vehicle you'll use it with.
In Stock


Need help with installation?
Locate installers near me- All Info
- Q & A (0)
- Videos (1)
- Photos
Front Runner Car Organizer - FR98RV
- Cargo Organizers
- Cargo Tray
- Black
- Front Runner
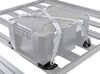
Maximize your vehicle's cargo area by adding a storage tray behind your rear seats. Top and side channels make adding tie downs or Front Runner accessories easy. Installs using existing mounting holes - no drilling. Custom fit for your vehicle.
Features:
- Maximize your vehicle's cargo area by adding a raised tray behind your rear seats
- Works with hard or soft tops
- Comprised of Front Runner crossbars and steel plates
- Top and side channels make adding tie downs or accessories easy
- Rubber beading in channels creates a non-slip, rattle-free surface
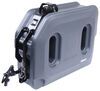
- Raised design accommodates a standard sized fridge and fridge slide
- Installs using existing mounting holes - no drilling required
- Black powder coated steel and aluminum resists corrosion
Specs:
- Tray dimensions: 58-1/8" wide x 21-11/16" deep x 1-13/16" tall
- Weight: 56.31 lbs
- 2-Year warranty
VACC021 Front Runner Slimline II Interior Cargo Tray - Cargo Shelf - Interior Rack
Installation Details
This Product Fits The Following Vehicles
- 2018 - 2018 Jeep JK Wrangler Unlimited
- 2007 - 2017 Jeep Wrangler Unlimited
Video of Front Runner Slimline II Interior Cargo Tray - Custom Fit


Videos are provided as a guide only. Refer to manufacturer installation instructions and specs for complete information.

Video Transcript for Front Runner Slimline II Interior Cargo Tray Review
Hey everyone, it's Evangeline here at Etrailer. Today we're gonna be taking a look at the Front Runner Slim Line two interior cargo tray. This is going to create a shelf within your vehicle and very similar to the Front Runner Slimline II rack that you'll see on top of a lot of cars, this is going to create that cargo space but also be compatible with all those fun accessories. Like a lot of those roof trays, this is also custom fit for the vehicle, so in our case, we have it here installed on our Jeep Wrangler Unlimited, so our four door Jeeps, and this will utilize the hardware and mounting points of the Jeep. Later on in this video, I'll show you how to get this all assembled. The overall features though is that this creates a very strong base.
So you have your Front Runner steel construction with that black powder coat finish. You have some channels within the slats. You get three slats with this for your accessories, very popular with Front Runner accessories. Plus this creates a flat surface for those heavy items like fridges, large cargo totes, you do have a weight capacity of 250 pounds. How much space do you actually have for your cargo Well, you do have your tray dimensions, but you can see here that this tray fits around the Jeep.
So for our smallest dimensions, if you measure between the arms, that's gonna be 48 inches of space. If you measure between the rails, you're gonna have a length of 20 inches and a quarter of an inch. Now you can adjust this tray up and down for height, I have it at its highest setting now. So from the tray to our top arm, that's gonna be 13 and a half inches of clearance. Again, at its highest setting, that means we have some clearance from the floor to the bottom of the trim, and this is gonna be 21 and a half inches.
Depending on what you wanna carry underneath, you can adjust this up to an inch and a quarter lower. So that's gonna be your overall measurements. This can also be paired with the Front Runner cargo slide. Definitely check that one out here at Etrailer. If you wanna carry heavy things like fridges, that's very popular pairing with our top shelf.
For cargo management, you have these raised rails in the front and the back. These rails are going to sit at an inch tall up off the tray. So helpful if you have totes to prevent them from sliding off the tray and into your Jeep. Now I do recommend finding some eye bolts or anchors if you do wanna strap things down. You have your three slats that have the channels that are compatible with your standard M8 hardware. So there's a lot of Front Runner accessories, but if you wanna make your own accessory, you can do that too. If in doubt, just double check if the accessory can work on the regular slim line to roof tray because overall the quality, the construction, the design is very much the same as that roof tray. In fact, Front Runner also has available here at Etrailer, the top tray for the Jeep. So having 1, 2, 3 levels could be something you could look into. If you we inchesre trying to access the tracks underneath the rack though, do be mindful that because of how it is installed, you do lose access to those extra tracks. The installation though, is pretty simple, especially if you do the way that I learned how to do it after a bit of trial and error. It does get a little bit tedious towards the end, but hopefully this is gonna be a one time install for you. Because of how this roof tray is designed, it is gonna hold up to the elements. Whether you have a hard top, soft top or no top at all on your Jeep, this will work. Be mindful that this specific kit though is designed for the JKU Jeeps, meaning the Jeep Wrangler Unlimited all the way up to year 2017, but you can also double check our fit guide at etrailer.com to find the right fit for you. Since this is custom fit for your Jeep, you don't nearly need that many tools. So here's what I use, I have a T40 torque spit. This is gonna be our wrench to take off some bolts. We also have a 13 millimeter wrench and then we have a four and five millimeter hex heat. Also grab your tape measure to take those measurements. Let's go. What I do first is I assemble the brackets. We have a right hand and a left hand side. What I am holding here is the right hand side or the passenger side. So just to help you out, notice how it is towards the back of the long bracket. So you have these different holes. So if we're gonna move it all the way to the back, this makes this the right hand side. And for comparison, this right here is the left hand side, so you can see the difference. Secure the brackets with your cage nut. So holding those in are your bolts. You are going to use a flat washer, split washer, and your four millimeter Allen key to tighten it down. As you tighten it down, notice how there are those different holes. That's gonna be for if you want to adjust the height of your shelf. I currently have our shelf set to the tallest height. Now go into your Jeep and along the Jeep size there's gonna be six torque screws, 1, 2, 3, and the same on the other side. These are usually used to secure the roof to your Jeep. When you take the roof off, you should be leaving those screws back in there. If you find they're not in there, go double check your roof. Now you take those off with your T40 torque wrench and then those need to be out of the way so you can fit your brackets onto those holes. Now if you find that the nuts don't seem to line up, that's okay because for the Jeep you can adjust where those nuts sit like that, and that will help you get that lined up with your bracket. So with the bracket in place, you can now put those torque screws back in and if you lose your bolts, you can also just use M8 hardware to secure these brackets. The way I've found as the easiest way to get this installed is just to attach all of our bolts underneath the slats ahead of time before they go onto the Jeep. So this is what it looks like disassembled. Notice how we have three slats and then we have two top hats. So the front slat is going to get four of the small half nuts. The middle slat is going to get seven of the half nuts, and then the last slat is going to get three of them. Each slat also gets two of these bolts, so one on each side. So slide the bolts in first through that machine hole, and then you can attempt to slide them through maybe a little tricky at first, and then you can get these half nuts through as well. So I just drop them in and then you can use either the bolt or an Allen key or just your hand to slide them into the general direction. We are gonna start with our front slat and those bolts are so that they can fit into the holes on the bracket. So just slide them up, up, and into place. Secure with your flat washer and nut. And you're just gonna hand tighten these down for now because you'll want to be able to adjust them when all the other parts are in place. So with all three slats in place, we're then going to attach the top hats. So right here, this is what the top hat looks like and there's two of them. You're gonna want the longer top hat to be towards the front and the shorter one towards the back because it needs to maneuver around the arms. So just gonna pivot it into a place like that. (metal clanking) This is what it looks like from underneath and this is why you want your slats loose. So you can make these adjustments of the half nuts. So notice how I'm trying to get it lined up with the holes on our top hat. Once I have the half nut and the hole lined up, we can then secure it with our little button head bolts. So notice how they have that washer on them, get one slat lined up before you start worrying about the other one. You are gonna have to be patient on this step just because getting all the bolts and nuts lined up can be a little tricky, especially since you're upside down. So just always double check how many nuts you have and just be patient with this process. With these slats installed and tightened down, you can now adjust your entire system back and forth. This is where the tape measure comes in handy, just to make sure that everything is even on both sides, and then you can tighten down those bolts with your 13 millimeter wrench. (wrench cranking) Now's a good time to install your rubber strips into the slots. The most important ones are gonna be the front and the back, but you can also put them on the T slots in the middle, especially if you have cargo that you want sitting on it so that it provides a non-slip surface. We're not gonna install these today just because our cargo doesn't need it, but it's there for if you need it. After double checking all of the nuts and bolts and making sure that they are tightened down, plus giving it the good old shake test. That's it for your install. Hopefully this video was helpful for you with figuring out what type of roof interior tray this is and how to find the accessories that work with it. Front Runner works with the standard M8 hardware, so that should be very easy to source. Another thing though is that this works amazingly with the other Front Runner accessories. You can check those out here on our website if you're curious about how those assemble as well. But other than that, this is gonna be a very custom fit, especially for your Jeeps. If you do not have a Jeep but you still want something similar to this, we do have options. You can either get the Front Runner Slimline II roof tray for your roof or check into our cargo organization options as an alternative. But right here, right now, this was a look at the Front Runner Slimline II interior cargo tray, and you saw it at etrailer.com. My name's Angeline and I hope you enjoyed the journey.
0
0
See what our Experts say about this Front Runner Car Organizer
Info for this part was:

Video Edited:
Chris R

Edited by:
Daron K

Installed by:
Evangeline M

Written by:
Ashley K
At etrailer.com we provide the best information available about the products we sell. We take the quality of our information seriously so that you can get the right part the first time. Let us know if anything is missing or if you have any questions.
Product Experts Available Now!
Call 1-800-940-8924
Thank you! Your comment has been submitted successfully. You should be able to view your question/comment here within a few days.
Error submitting comment. Please try again momentarily.